How to Upload a Model
This document guides through the model upload process. We need to follow a certain code template, in-order for a model to be uploaded and deployed successfully on the Platform. Follow the steps below for the model upload process:
1. A "model.py" file needs to be created first of all.
1.1. Its structure would be as follows:
class GesundModel:
    def __init__(self):
        # Required
        # load required dependencies
        # load the model here
        self.model = model

    def preprocess(self):
        # Optional:
        # create a preprocessing function and use it inside predict
        ...

    def postprocess(self):
        # Required
        # create a post processing function to post process
        # the result from predict function
        # some postprocessing.
        ...

    def predict(self, input):
        # Required
        # raw input is recived need to preprocess it and predict
        # post processing should be seperated.

        input = self.preprocess(input)
        output = self.model.predict(input)
        return output

    def loss(self, y_pred):
        # Optional
        # compute loss function
        ...
1.2. The "postprocess" function has a unique pre-defined output structure for Classification, Object Detection, and Instance Segmentation type model. They are as follows:
1.2.1. For Classification:
output = {
            "prediction_class": int(class_index),
            "confidence": float(confidence),
            "logits": prob.tolist(),
            "status": 200,
        }
1.2.2. For For Object Detection:
output = {
"box": [  {"x1": int(b[1]), "y1": int(b[0]), "x2": int(b[3]), "y2": int(b[2])}    ],
 "prediction_class": int(i_labels[i]),
 "confidence": float(v_scores[i])
 }

{"objects": output}
1.2.3. For Instance Segmentation::
mask = {
        "mask": [(x1, y1), (x2, y2), ..(xn, yn)],
        "class": 1
        "confidence": 0.1,
        }
{"masks": [mask]  "status": 200}
1.3. An example for a platform model's "model.py" file is shown below.
class GesundModel:
    def __init__(self, model_path) -> None:
        self.model_path = model_path
        self.load()

    def load(self):
        model = return_model()                # "return_model() function Imported from a model library or .py file
        model.load_weights(self.model_path)   # This additional .py would also be included along with this model.py file
        self.model = model

    def _preprocess(self, img):
        img = Image.fromarray(img.astype(np.uint8))
        img = img.resize((224,224))
        img = np.array(img)
        img_np = np.expand_dims(img,0)
        return img_np

    def preprocess(self, img,batch):
        if not batch:
            return self._preprocess(img)
        else:
            preprocessed_imgs = []
            for single_image in img:
                preprocessed_img = self._preprocess(single_image)
                preprocessed_imgs.append(preprocessed_img)
            return preprocessed_imgs

    def predict(self, img,batch=False):
        img = self.preprocess(img,batch)
        if not batch:
            pred = (self.model.predict(img).ravel().tolist())
            return pred
        else:
            preds = []
            for single_image in img:

                pred = (self.model.predict(single_image).ravel().tolist())
                preds.append(pred)
            return preds

    def postprocess(self,pred,batch):
        if not batch:
            confidence = max(pred)
            predicted_class = pred.index(confidence)
            return {
                "prediction_class": predicted_class,
                "confidence": confidence,
            "logits": [
                pred[0],
                pred[1]
            ]
               }
        else:
            output_list = []
            for pr in pred:
                confidence = max(pr)
                predicted_class = pr.index(confidence)
                out =  {
                "prediction_class": predicted_class,
            "confidence": confidence,
            "logits": [
                pr[0],
                pr[1]
            ]
               }
                output_list.append(out)

            return output_list

    def loss(self, y_pred, gts):
        if not any(isinstance(el, list) for el in gts):
            gts = np.asarray(list(map(lambda x: int(x["class"]), gts)))
        # Apply loss function
        _loss_function = tf.keras.losses.CategoricalCrossentropy(reduction="none")
        gts_encoder = np.zeros((gts.size, 2 ))# 2 is number of classes
        gts_encoder[np.arange(gts.size), gts] = 1
        losses = _loss_function(y_pred, gts_encoder).numpy()

        return losses.tolist()
1.4. Main thing to note from this example is that Batch predictions are needed in order to run Validation on the platform using this Model, therefore there are "if not batch" and "else" conditions in the functions of the Model class.
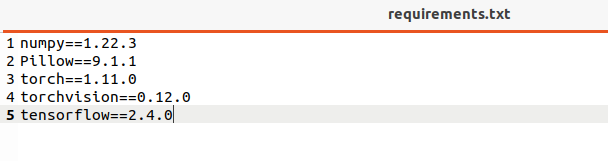
2. A "requirements.txt" file needs to be created with all the model dependencies in pip format, as shown below:
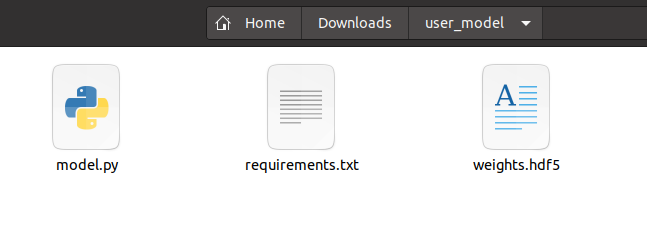
3. Create a folder titled "user_model".
4. Place the "model.py", "requirements.txt", and the model file (.h5, .hdf5) into the "user_model" folder.
5. The resulting folder with its contents should look as shown below:
6. The "user_model" should be zipped using the following commands in the terminal:
cd user_model
zip -r user_model.zip *
Next Steps: Once you've zipped your model folder, you can proceed to upload it via the platform's Models tab. The UI will guide you through selecting your model type, framework, and filling in relevant metadata and class mappings.
📌 Note: The remaining steps of the upload process are performed within the Gesund.ai user interface and are self-explanatory through the guided form. Follow the on-screen instructions to complete your model registration and deployment.